Wednesday, November 30, 2011

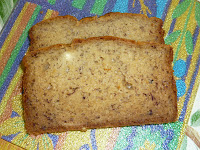
carrot and orange cake

The recipe in this post was adapted from a recipe that I found in The Australian Women's Weekly cookbook.

As it turned out, the cake was very moist and soft. In fact, it was so moist that I could not resist eating a slice even before the cake had thoroughly cooled down.

I used an 8" x 5" loaf pan. If, however, you prefer a higher loaf, do use a slightly smaller loaf pan.

INGREDIENTS

1 cup self-raising flour
1 tsp ground nutmeg
1 tsp ground mixed spice
125g butter (softened)
grated rind of 1 orange
1/2 cup castor sugar
2 eggs
1 cup raisins
1 large carrot (grated)
2 tbsp orange juice

METHOD

1. Preheat the oven to 160 degrees celsius.

2. Grease and line an 8" x 5" loaf pan with baking paper. Set aside.

3. Sift the self-raising flour, ground nutmeg and ground mixed spice in a bowl. Set aside.

4. Cream the butter, orange rind and castor sugar in a mixing bowl using an electric mixer until light and fluffy. Add the eggs, 1 at a time, beating well with each addition. Add the raisins, grated carrot and orange juice and mix well.

5. Fold in the flour mixture using a wooden spatula and mix until well blended.

6. Pour the batter into the prepared pan and bake for 1 1/2 hours or until a skewer inserted in the middle of the cake comes out clean.


Monday, November 28, 2011

milo muffins

This is another of my experiments in my quest to come up with simple recipes that Da's and my god-children (the eldest of whom is 9 years old and the youngest of whom is 4 years old) can have fun trying. The beauty about baking with the aid of little pairs of hands is that the little ones are eager to help and they enjoy the team effort.

I baked these muffins when Da and I came home from dinner around 11 pm on a weeknight. Although we had already eaten our dinner, I could not resist eating half of a muffin when it was still warm from the oven. I saved the other half for Da (who had by then fallen asleep). The rest of the muffins were packed in containers for Da and I to bring to our respective offices to share with our respective colleagues.

You can use a hand whisk instead of an electric mixer. However, lately my electric mixer has been placed on our kitchen counter-top (instead of being stored in the cupboard and taken out only when I need to use it). As such, it is convenient for me to use the electric mixer because my electric mixer comes with a stand and I can do other chores while the electric mixer is in use. Ah... the luxury of multi-tasking.

INGREDIENTS

270g self-raising flour
30g Milo
1 tsp baking powder
50g butter (softened)
80g brown sugar
200g semi-sweet chocolate chips
2 eggs (lightly beaten)
225 ml low-fat milk
1 tsp vanilla essence


METHOD

1. Preheat the oven to 180 degrees celsius.

2. Line the muffin pans with muffin cups.

3. Sift the self-raising flour, Milo and baking powder in a large bowl. Set aside.

4. Cream the butter and sugar in a mixing bowl using an electric mixer or a hand whisk until light and fluffy. Add the eggs, milk and vanilla essence and mix well. Stir in the chocolate chips.

5. Pour the wet ingredients into the flour mixture. Mix until just blended. Do not overmix. The batter will be lumpy.

6. Spoon the batter into the prepared muffin pan and bake for 20 minutes or until a skewer inserted in the middle of the muffin comes out clean.

Saturday, November 26, 2011

pumpkin seed and banana bread

When I made this loaf of pumpkin seed and banana bread, the dough rose so much that I had to use a 10" x 7" loaf pan instead of my usual 8" x 5" loaf pan. Alternatively, you may like to use two smaller loaf pans (eg. two 8" x 4" loaf pans) if you do not want a large loaf of bread.

Due to the inclusion of yoghurt in the dough, the bread remained soft even on the 3rd day without refrigeration.

INGREDIENTS

200g plain yoghurt
1/2 cup low fat milk
2 1/2 tbsp castor sugar
1/2 tsp salt
1 egg (lightly beaten)
2 tbsp butter (softened)
1 large overripe banana (mashed)
1/4 cup pumpkin seeds (crushed)
4 cups bread flour
2 1/2 tsp instant dry yeast

METHOD

1. Place all the ingredients (except the bread flour and the yeast) in the bucket of the breadmaker machine.

2. Add the bread flour, making sure that the wet ingredients are totally covered.

3. Add the yeast.

4. Place the bucket in the breadmaker machine and set to "dough" cycle. Start the cycle.

5. When the cycle has been completed, turn the dough onto a floured board. Using floured hands, knead the dough about 5 times.

6. Place the dough in a 10" x 7" loaf pan that has been greased and lined with baking paper. Spread out the dough.

7. Cover the loaf pan with a damp cloth and leave for 1 hour or until the dough has doubled in size.

8. Bake in an oven preheated to 180 degrees celsius for 35 minutes.

Thursday, November 24, 2011

sour cream banana cake

This is the first time that I have used sour cream in my cake batter. I was initially concerned that the inclusion of sour cream would make the cake, well... sour. However, not only was the cake not sour, it was extremely moist and I could not resist sampling a slice of the cake even before it cooled down.

If you happen to have some balance sour cream in the refrigerator, do give this recipe a try. You do not need a lot of sour cream - you only need 3/4 cup sour cream.

I used a 8" x 5" loaf pan to bake this cake.

A word of "caution" though... this cake is very moist. As such, do not slice the cake too thinly else the cake may break into pieces easily.

INGREDIENTS

1 1/2 cups self-raising flour
1 tsp bicarbonate of soda
1/4 tsp ground mixed spice
3/4 cup sour cream (softened)
1 tbsp low fat milk
125g butter (softened)
3/4 cup brown sugar
2 eggs
3 large bananas (mashed)

METHOD

1. Preheat the oven to 180 degrees celsius.

2. Grease an 8" x 5" loaf pan and line with baking paper. Set aside.

3. Sift the self-raising flour, bicarbonate of soda and ground mixed spice in a bowl. Set aside.

4. Mix the sour cream and milk in a bowl. Set aside.

5. Cream the butter and sugar in a mixing bowl using an electric mixer until light and fluffy. Add the eggs, 1 at a time, mixing well with each addition of egg. Add the bananas and mix well.

6. Fold in half the flour mixture and add half the sour cream / milk mixture. Mix well using a wooden spatula. Repeat using the balance flour mixture and balance sour cream / milk mixture.

7. Pour the batter into the prepared pan.

8. Bake for 1 hour.

Tuesday, November 22, 2011

peanut butter loaf

The recipe in this post is a modification of a recipe that I came across in HHB's blog.

It may be due to the age of my breadmaker but I have noticed that when I use the breadmaker to make the bread from start to finish, the texture of the bread is not as soft as when I use only the "dough" cycle of the breadmaker machine and bake the bake in the oven. As such, nowadays I prefer to bake the bread in the oven after using my breadmaker to make the dough.

The other thing that you have to take note of when making bread is the yeast. I used to be unsuccessful with almost every loaf of bread that I made (regardless whether I used the breadmaker or not). When I switched to another brand of yeast, every loaf of bread was successfully made (except for the times when I got too carried away with modifying recipes or creating recipes and went overboard with the ingredients). I am not certain whether the problem lies with the brand of yeast that I used to use or the fact that the yeast was not fresh.

INGDEDIENTS

1 tbsp peanut oil
1 3/8 cups water
3 tbsp chunky peanut butter
1 tsp salt
2 tsp brown sugar
2 tbsp dried milk powder
1/4 tsp ground cinnamon
3 cups bread flour
2 tsp instant dry yeast


METHOD

1. Place all the ingredients (except the bread flour and yeast) in the bucket of the breadmaker machine.

2. Add the bread flour, making sure that the wet ingredients are totally covered.

3. Add the yeast.

4. Place the bucket in the breadmaker machine and set to "dough" cycle. Start the cycle.

5. When the cycle has been completed, place the dough in an 8" x 5" loaf pan that has been greased and lined with baking paper. Spread out the dough in the loaf pan.

6. Cover the loaf pan with a damp cloth and leave for 1 hour or until the dough has doubled in size.

7. Bake in an oven preheated to 180 degrees for 45 minutes.

Sunday, November 20, 2011

orange cake

The recipe for the orange cake that you see in this post is so easy that I baked the cake when I came home late from work, left the cake to cool when it was baked, went to sleep, woke up the next morning to slice the cake, brought the sliced cake to the home of my friend KN whose three children are Da's and my god-children (oops... I just gave you the answer to one of the questions in my Quiz) and then made my way to work.

Here are some tips when baking this cake:-
(a) all your ingredients should be at room temperature;
(b) the butter should be softened and not melted; and
(c) the batter should be beaten for the suggested time only and not longer.

INGREDIENTS

150g butter
grated rind of 1 orange
2/3 cups castor sugar
3 eggs
1 1/4 cups self-raising flour
1/4 cup milk
METHOD

1. Preheat the oven to 180 degrees celsius.

2. Grease and flour an 8" round cake pan. Set aside.

3. Place all the ingredients in a mixing bowl. Beat on low speed using an electric mixer until the ingredients are combined. Increase the speed to medium and beat for 3 minutes or until the mixture is changed in colour and smooth.

4. Pour the batter into the prepared cake pan.

5. Bake for 45 minutes or until a skewer inserted in the middle of the cake comes out clean.

Friday, November 18, 2011

banana hoon kueh

Mung bean flour is known locally as hoon kueh flour.

A typical recipe for banana hoon kueh is as follows:-
(a) Steam the banana for 5 minutes. Let the banana cool before slicing the banana into small pieces.
(b) Cooked the banana leaves in boiling water until the leaves are soft. Cut the leaves into desired size for wrapping.
(c) Mix the coconut milk, hoon kueh powder, rice flour and tapioca flour.
(d) Mix the water, sugar and salt and boil until the sugar dissolves.
(e) When water has boiled, add the flour mixture and cook until it boils and thickens.
(f) Spoon 1 tbsp of hoon kuey on the banana leaf and place 2 to 3 slices of banana on top. Top off with another 2 tbsp of hoon kuey before wrapping up the hoon kuey.
(g) Let the wrapped banana hoon kueh cool before refrigerating it.

I decided to make a simpler version of banana kueh using mung bean flour but without rice flour and tapioca flour. Also, I used the jelly mould that is used for konnkayu jelly instead of wrapping the banana kueh in banana leaves.

INGREDIENTS

2 large bananas (cut into small cubes)
1/2 tsp pandan flavouring
90g mung bean flour
180g raw sugar
450ml coconut milk

METHOD

1. Cut the banana into small cubes. Add the pandan flavouring and mix well.

2. In a pot, mix the banana, mung bean flour, raw sugar and coconut milk.

3. Heat up the pot and stir constantly until the mixture thickens.

4. Pour into jelly moulds. When the banana kueh has cooled, refrigerate the banana kueh.

Wednesday, November 16, 2011

vegan apple cake

This is the second time that I have made a foray into vegetarian / vegan baking. My first attempt was baking vegetarian seaweed cookies and I was pleasantly surprised at how the cookies turned out.

When my friend Hamtaro and her sons, Eddy and Eddie came to our home for lunch, I decided to take the opportunity to bake a vegan apple cake. Although they are vegetarian, there are some types of food that vegetarians do eat which they choose not to eat, such as eggs. As I was not certain whether they consumed margarine, I decided to "play it safe" by omitting eggs and margarine when I baked the apple cake.

Even if you are not a vegetarian / vegan, do give this a recipe a try. The cake is moist and delicious.

INGREDIENTS

1 1/2 cups plain flour
1 1/2 tsp bicarbonate of soda
1/4 tsp salt
1 cup castor sugar
1 cup apple juice
1/2 cup vegetable oil

METHOD

1. Preheat the oven to 180 degrees celsius.

2. Grease the bottom and sides of an 8" round cake pan with vegetable oil. Line the bottom of the cake pan with baking paper and flour the sides of the cake pan with a little plain flour.

3. Sift the plain flour, bicarbonate of soda and salt in a bowl. Set aside.

4. Mix the sugar, apple juice and vegetable oil in a mixing bowl using a hand whisk.

5. Fold in the flour mixture and mix using the hand whisk until blended.

6. Pour the batter into the prepared pan and bake for 40 minutes or until a skewer inserted in the middle of the cake comes out clean.

7. Let the cake cool in the cake pan for 5 minutes before removing the cake and letting the cake cool thoroughly on a wire rack.

Monday, November 14, 2011

chicken pie

I like eating chicken pie. Somehow, I prefer it to curry puff, tuna puff or sausage roll. Hans Cafe sells a regular-sized chicken pie and an extra-large chicken pie called "Carbonara Pie". The difference is that the Carbonara Pie is larger than the regular-sized chicken pie and also contains herbs and vegetables.

In the past, whenever I cooked anything that involved potatoes (eg. curry chicken), I would boil the potatoes first because they take longer to cook. However, I have since learned from my brother (LG) that I should fry the potatoes first till they are golden brown before I proceed to cook the rest of the dish.

It is not difficult to make your own chicken pie. There is a fair amount of work involved but it is worth it. The pastry should be prepared a day before and refrigerated so that it is firm enough to roll out.

INGREDIENTS (pastry)

150g butter
250g plain flour
1 tsp castor sugar
1 egg yolk
1/4 tsp salt
1/2 tsp dried rosemary leaves
1/2 tsp dried thyme leaves
100g plain yoghurt


INGREDIENTS (filling)

olive oil (for frying)
2 large potatoes (diced)
2 large red onions (diced)
2 sticky celery (sliced)
2 carrots (diced)
1 can peas
1 can young corn (sliced)
1 can sliced mushroom
2 pieces of chicken breast (sliced)
1/2 cup water
1 tbsp cornflour mixed with 2 tbsp water
1 tbsp fine sugar
1 tbsp oyster sauce
freshly grated sea salt
freshly grated black peppercorn
freshly grated white peppercorn
1 egg (for glazing)

METHOD (pastry)

1. Rub the butter in the flour in a mixing bowl until the mixture resembles breadcrumbs.

2. Add the sugar, egg yolk, salt, dried rosemary leaves and dried thyme leaves. Mix well.

3. Add the plain yoghurt. Use the electric mixer (and dough hook) and mix to a dough.

4. Wrap the dough in cling wrap and refrigerate overnight.


METHOD (filling)

1. Fry the potatoes in oil until golden brown. Set aside.

2. Fry the red onions, celery and carrots until soft.

3. Add the peas, corn, mushroom and chicken breast and continue frying.

4. Add the potatoes and mix well.

5. Add 1/2 cup water and cook for 5 minutes, stirring constantly.

6. Add the sugar, oyster sauce, sea salt, black peppercorn and white peppercorn.

7. Add the cornstarch and stir until the mixture thickens.

8. Cool and set aside.

METHOD (pie)

1. Grease two 8" diameter pie dishes and set aside.

2. Divide the dough into two equal halves (that is, one per pie dish).

3. Further divide each half of the dough into two. This time, do not divide into equal halves. One of the halves should be slightly bigger than the other half. The bigger half is intended to cover the base of the pie dish whereas the small half is to cover the top of the pie.

4. Roll out each piece of dough.

5. Line the bigger pieces of rolled-out dough at the bottom and side of the pie dish. Poke holes at the base using a fork.

6. Divide the filling into two portions and place each portion in each pie dish.

7. Cover the pie with the smaller piece of rolled-out dough. Poke holes at the top of the pie using a fork. Press the fork around the edge of the crust. Trim off any excess dough using a butter knife and use the excess dough to create designs on top of the pie (see for example, the design of the leaf in the photograph below).

8. Brush the top of the pie with a beaten egg.

9. Bake the pies in an oven preheated to 180 degrees for 30 minutes.

Saturday, November 12, 2011

slow cooker bread pudding

When Da and I got married in 1998, my mother gave us (among many other wonderful gifts) a large slow cooker. I have used it many times since. It is perfect for lazy days when I am not inclined to slave over a stove top to cook my pasta sauce.

As time went by, I realised that it would be useful to have a small slow cooker as well. Not only could we use it to brew herbs for one-time consumption, we could also use it to cook small portions of meals, just for the two of us. I happened to mention to my mother my desire for a small slow cooker and, bless my wonderful mother, she was so thoughtful that she bought us a small slow cooker as a gift.

Recently, I decided to get adventurous and cook bread pudding using my small slow cooker. I have made bread pudding before but always using my convection oven.

The bread pudding that I made using my slow cooker is sufficient to serve 3 persons (unless you are my little sister, LSD who is a very small eater, in which case the bread pudding is enough to serve 4 persons).

INGREDIENTS

4 cups bread (cubed)
1 cup low fat milk
2 eggs
1/8 cup sugar
1/8 cup butter (softened)
1/4 tsp vanilla essence
1/8 tsp ground mixed spice
1/2 cup longan meat (cut into small pieces)

METHOD

1. In a mixing bowl, combine the milk, eggs, sugar, butter, vanilla essence and ground mixed spice. Beat using a manual whisk until smooth.

2. Add the longan meat and stir.

3. Add the cubed bread and mix thoroughly.

4. Pour the mixture into the slow cooker.

5. Cover and cook on LOW for 3 hours.

TIPS

1. When I made the bread pudding, I used a mixture of chocolate bread and fruit & nut bread. As such, I added brown sugar instead of white sugar as the bread is already sweet. If you are using plain bread, you can add white sugar instead.

2. If you do not have longan meat, you can substitute with raisins.

Thursday, November 10, 2011

banana and cheese cake

I do not know what came over me when I baked this cake. I was planning to bake a banana cake. However, as I was preparing the ingredients for the cake, I decided to do a little experiment and bake a "yin yang" type of cake, that is, one containing sweet and savoury ingredients. I ended up adding mashed bananas and grated cheddar cheese to the batter. Guess what? The cake turned out nice and it was not overly sweet nor overly savoury. It had a hint of custard texture, like the durian custard cake, although it is more cake-like.

INGREDIENTS

1 large overripe banana (mashed)
50g cheddar cheese (grated)
1 cup and 2 tbsp plain flour
1/2 tsp baking powder
1/2 tsp ground cinnamon
1/8 tsp salt
125g butter (softened)
1/2 cup brown sugar
2 eggs
1/4 cup milk

METHOD

1. Preheat the oven to 165 degrees celsius.

2. Grease and line a loaf pan with baking paper. Set aside.

3. Mix the mashed bananas and grated cheddar cheese in a bowl. Set aside.

4. Sift the plain flour, baking powder, ground cinnamon and salt in a mixing bowl. Set aside.

5. Cream the butter and brown sugar in a large mixing bowl. Add the bananas and grated cheddar cheese and mix well.

6. Add 1 egg to the butter mixture and mix well. Repeat with the other egg.

7. Add the flour mixture and milk, alternating in 3 portions.

8. Check the consistency of the batter. If it is too stiff, add a little more milk.

9. Bake for 50 minutes or until a skewer inserted in the middle of the cake comes out clean.
Blog Widget by LinkWithin