Monday, October 31, 2011

corn cake

I have been having fun with the box of corn meal that Da and I bought from Cold Storage Supermarket at Eastwood Centre.

My latest use of the corn meal is to bake corn cake.

Other than corn muffins, corn bread and corn cake, you can also use corn meal as an ingredient for the crust of pies, you can mix the corn meal with plain flour and use it as batter for fried chicken, etc. Have fun experimenting!

INGREDIENTS

1 1/2 cups plain flour
1 tbsp baking powder
1/2 tsp salt
2/3 cup castor sugar
1/2 cup corn meal
3 tbsp butter (softened)
1 1/4 cups low fat milk
2 eggs (beaten)
1/3 cup sunflower oil

METHOD

1. Preheat the oven to 175 degrees celsius.

2. Grease and flour an 8" x 8" square cake pan. Set aside.

3. Sift the plain flour, baking powder and salt in a bowl. Add the castor sugar and corn meal and mix well. Set aside.

4. Cream the butter in a large bowl until light and fluffy. Add the milk, eggs and oil and mix well.

5. Fold in the flour mixture and stir until just blended.

6. Pour the batter into the prepared cake pan.

7. Bake for 40 minutes or until a skewer inserted in the middle of the cake comes out clean.

Saturday, October 29, 2011

matcha raisin cake

When I baked the matcha raisin cake that you see in this post, I could smell the green tea as the cake was baking in the oven.

Whilst I have no complaints about the flavour of the cake, I do wish that the cake was, well, more green in colour. I used matcha (that is, finely powdered green tea) that was intended for use as a drink. I shall have to hunt around for matcha that is suitable for baking - I am not sure but perhaps there is another type of matcha that would give the cake a more greenish colour.

INGREDIENTS

3 cups plain flour
1 1/2 tsp baking powder
1 tsp ground almond
3 tbsp matcha
1 1/2 cups butter (softened)
2 cups castor sugar
6 eggs
1/2 cup raisins

METHOD

1. Preheat the oven to 170 degrees celsius.

2. Grease a 9" cake pan and line with baking paper. Set aside.

3. Sift the plain flour, baking powder, ground almond and matcha in a bowl. Set aside.

4. Cream the butter in a large mixing bowl. Add the sugar and mix well.

5. Lightly beat 1 egg and add to the butter mixture and mix well. Repeat with the rest of the eggs.

6. Add the raisins and stir well.

7. Fold in the flour mixture and mix until blended.

8. Pour the batter into the prepared pan.

9. Bake for 45 minutes or until a skewer inserted in the middle of the cake comes out clean.

Thursday, October 27, 2011

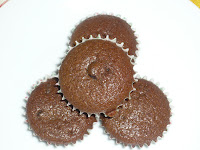
chocolate chip cupcake

The chocolate chip cupcake that you see in this post nearly did not materialise. It was one of those times that I kept having "inspiration" at the last minute and I added ingredients during the preparation process.

I had intended to bake some mixed fruit cupcakes. As I rummaged through my larder, I found some Hersheys semi-sweet chocolate chips (equivalent to about 1 1/2 cups) and I changed my mind and decided to bake chocolate chip cupcakes instead.

Wanting a bit of variety, I decided to add some cocoa powder to the plain flour so as to make the cupcake itself chocolatey.

At the last minute, I made a decision to use low-fat milk as the liquid for the cupcake.

Thank goodness the cupcake turned out fine! Had it been a disaster, it would have been such a terrible waste of delicious Hersheys semi-sweet chocolate chips.

INGREDIENTS

1 tsp bicarbonate of soda
1 tsp baking powder
1/2 tsp salt
1 1/2 cups plain flour
1/2 tsp ground cinnamon
1/4 cup cocoa powder
1 cup brown sugar
1 egg (beaten)
75g butter (softened)
1 1/2 cups low fat milk
1 1/2 cups chocolate chips


METHOD

1. Preheat the oven to 175 degrees celsius.

2. Line the cupcake trays with paper cups.

3. Sift the bicarbonate of soda, baking powder, salt, plain flour, ground cinnamon and cocoa powder in a bowl. Set aside.

4. Whisk the sugar, egg, butter and milk in a large bowl. Stir in the chocolate chips and mix well.

5. Fold in the flour mixture and stir until just combined. The mixture will be lumpy.

6. Pour into the paper cups.

7. Bake for 20 minutes or until a skewer inserted in the middle of the cupcake comes out clean.

Blog Widget by LinkWithin