Saturday, January 30, 2010

mixed fruit jam

Making mixed fruit jam is an easy way to use up the leftover fruits in your refrigerator. The simplicity of this recipe is that there is really no recipe insofar as the fruit ingredients are concerned. You can mix and match to your taste.

For the mixed fruit jam that you see in this post, I used a mixture of red apples, red jambu, green seedless grapes and strawberries.

INGREDIENTS

3 1/2 cups fruits
3 cups castor sugar
1/8 cup freshly squeezed lemon juice
1/2 tsp ground cinnamon

METHOD

1. Cut the fruits into small cubes.

2. Cook the cut fruits, castor sugar, lemon juice and ground cinnamon in a saucepan at high heat, stirring continuously.

3. Let the mixture boil for about 30 minutes.

4. When the mixture has thickened, remove any bubbles that may arise to the surface of the jam.

5. Pour the jam into glass jars and seal the jars immediately.

6. When the jam has cooled down, store the jam in the refrigerator.


TIPS

1. If you prefer smooth jam, transfer the cooked jam to a blender and blend for a minute or so, before you pour the jam into glass jars.

2. You can store the unopened bottle of jam in a cool place in the kitchen cabinet. However, once the bottle has been opened, you will need to refrigerate the jam.

3. As no preservatives have been added, it is best to consume the jam within a month.

Thursday, January 28, 2010

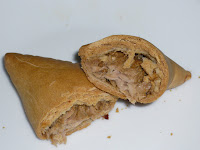
baked tuna puffs

This is my first attempt at baking tuna puffs. The pastry is the type that is not flaky. What makes this recipe easy is that you can find many varieties of canned tuna sold at the supermarkets. For this tuna puff, I used canned curry tuna.

Da has requested that the next time that I bake tuna puffs, I use canned chilli tuna as he found that the curry tuna not spicy enough for him.

INGREDIENTS

2 1/2 cups plain flour
1 tsp salt
1 tsp bicarbonate of soda
4 tbsp butter (cold)
1 egg (lightly beaten)
water
3 cans of curry tuna

METHOD

1. Preheat the oven to 180 degrees celsius.

2. Drain the gravy from the tuna using a sieve. Mash up the tuna and add enough gravy to keep the tuna moist without making it watery.

3. Sieve the self-raising flour, salt and bicarbonate of soda.

4. Add the butter to the flour mixture. Using your finger tips, rub the butter into the flour mixture until it resembles breadcrumbs.

5. Add the egg and gradually add water until you are able to form a dough.

6. Turn the dough onto a floured board and knead the dough until it is smooth.

7. Roll out the dough and cut into rounds of about 2 1/2" in diameter.

8. Flatten each round with a rolling pin and fill the centre with 1 tbsp of the filling.

9. Moisten the edges of the dough with water and fold the dough into half. Press down the edges using the teeth of the fork.

10. Bake for 25 minutes or until the tuna puffs are light golden brown.

Tuesday, January 26, 2010

durian muffins

Nowadays, whenever Da and I buy a main ingredient (such as bananas, carrots, etc), I will try to use the same ingredient to bake/make various types of cakes/cookies/bread, etc. For example, if we have a large bunch of overripe bananas at home, I will bake/make:-
(a) banana bread
(b) banana cake
(c) banana muffins
(d) banana ice cream
(e) banana cookies
(f) banana pie
(erm... not necessarily all on the same day but I will try to finish using up the ingredient before the weekend is over).

This way, there is no wastage of the ingredient. In the past, the leftover ingredient would end up being thrown away when it became spoiled if I did not finish using it up. Perishables tend to spoil easily and as such, if you were buy a bagful of apples, for example, you might as well make use of all the apples as soon as possible. Also, the family gets to enjoy various types of food using apples as the main ingredient.

Here is a simple recipe for durian muffins. It is essentially adapted from a standard muffin recipe but using durian pulp as the main ingredient. Do give it a try. The aroma of the durians as the muffins are baking in the oven is simply heavenly.

INGREDIENTS

350g durian pulp (mashed)
300g plain flour
2 tsp baking powder
1/2 tsp bicarbonate of soda
1/2 tsp salt
75g butter (softened)
100g castor sugar
1 egg (lightly beaten)
1 tsp durian essence
1 cup milk (please see tip below)

METHOD

1. Preheat the oven to 180 degrees celsius.

2. Line muffin pans with paper muffin cups. Set aside.

3. Separate the durian pulp from the seeds. Mash the pulp in a bowl using a fork and set aside.

4. Sift the plain flour, baking powder, bicarbonate of soda and salt in a bowl. Set aside.

5. Cream the butter and sugar in a mixing bowl using an electric mixer until light and fluffy. Add the egg, durian essence and milk and mix well. Add the durian pulp and mix until smooth.

6. Fold in the flour mixture and stir until just blended. Do not over-stir.

7. Spoon the batter into the paper muffin cups until 2/3 full.

8. Bake for 20 minutes or until a skewer inserted in the middle of the muffin comes out clean.


TIP

When you are folding in the flour mixture, add another 1/4 cup milk if the batter is stiff. It should be of slightly dropping consistency.

Sunday, January 24, 2010

raisin and chocolate chip cornbread

I had originally planned to bake a simple cornbread. However, when I found some balance raisins and semi-sweet chocolate chips in our refrigerator, I improvised and baked raisin and chocolate chip cornbread instead.

The beauty of this recipe is that you can easily improvise and create new types of cornbread.

Ingredients

1 cup plain flour
2 tsp baking powder
1 cup cornmeal
1/3 cup castor sugar
1/2 teaspoon salt
1 egg (beaten)
1/4 cup sunflower oil
1 cup milk
1/4 cup semi-sweet chocolate chips
1/4 cup raisins

METHOD

1. Preheat the oven to 200 degrees celsius.

2. Grease and flour an 8" x 8" square baking pan.

3. Sift the plain flour and baking powder in a mixing bowl. Add the rest of the ingredients and stir until just combined. The mixture will be lumpy.

4. Pour the batter into the prepared baking pan.

5. Bake for 25 minutes or until a skewer inserted in the middle of the cornbread comes out clean.

Friday, January 22, 2010

ginger cookies

I came across a recipe for ginger cookies in Cat can Cook's blog. I have in the past ever baked soft chewy ginger cookies. The recipe in Cat can Cook's blog seemed to yield crunchy cookies (based on what I could see of the ingredients). I prefer crunchy cookies to soft chewy cookies.

Whenever there is a recipe that I intend to try, I would usually review the recipe and decide whether to make any revisions to the recipe. In this case, I made the following changes to the recipe:-

(a) I used butter instead of Crisco. People will often tell you that nothing beats butter when it comes to baking delicious cakes and cookies. I tend to agree.

(b) The type of white sugar and flour were not specified in the recipe. I decided to add castor sugar (which is often used in baking) and plain flour. It did occur to me whether to substitute some of the plain flour with corn flour (to make the cookie more crunchy) but I decided to do a "taste-test" first.

(c) Over here, one can find Molasses in dry form, that is, like very dark and packed sugar. I added Molasses in this form when I baked the ginger cookies.

The verdict? The ginger cookies were delicious!


INGREDIENTS

2 cups plain flour
1 tsp bicarbonate of soda
1/2 tsp salt
1 tsp ground cinnamon
3 tsp ground ginger
1/2 cup butter (softened)
1 cup castor sugar
1/2 cup molasses sugar
1 egg (beaten)

METHOD

1. Sift the plain flour, bicarbonate of soda , salt, ground cinnamon and ground ginger in a mixing bowl. Set aside.

2. In a large mixing bowl, cream the butter with the castor sugar and molasses sugar. Add the egg and mix well.

3. Fold in the flour mixture and mix thoroughly.

4. Chill in the refrigerator for one hour. Thereafter, shape the dough and place them on a baking tray lined with baking paper. Bake in an oven preheated to 190 degrees for 10 minutes.

5. Let the cookies cool thoroughly before storing them in an air-right container.

Wednesday, January 20, 2010

banana loaf

I saw three bananas left on the bunch of bananas that Da and I bought recently. The bananas were already overripe and were in no condition to be eaten on its own.

I thought of baking a loaf of banana bread using my breadmaker machine but I changed my mind and decided to bake a banana loaf in my oven instead. The texture of the banana loaf is something between that of cake and bread as it involves the use of plain flour instead of self-raising flour. I believe that many people would categorise the banana loaf under "bread" instead of "cake".

Be that as it may, the overripe bananas were perfect for what I had in mind. When you bake banana bread / cake / muffins, it is advisable to use overripe bananas as they are sweeter and softer. The whole kitchen is filled with the lovely aroma of bananas when your banana cake / bread / muffin is being baked in the oven. The aroma lingers on for quite a while after you have finished baking.

INGREDIENTS

1 1/2 cups plain flour
1 tsp bicarbonate of soda
1/4 tsp ground cinnamon
1/8 tsp salt
450g ripe bananas (mashed) - equivalent to about 3 or 4 bananas
1/3 cup butter (softened)
3/4 cup castor sugar
1 egg (beaten)
1 tsp banana essence

METHOD

1. Preheat the oven to 175 degrees celsius.

2. Grease and lightly flour a 5" x 8" loaf pan.

3. Sift the plain flour in a mixing bowl. Set aside.

4. In a separate small bowl, sift the bicarbonate of soda, ground cinnamon and salt. Set aside.

5. Mash the bananas in a large mixing bowl. Add the butter and mix well.

6. Stir in the sugar, egg and banana essence to the mashed bananas.

7. Add the sifted bicarbonate of soda, ground cinnamon and salt. Mix well.

8. Fold in the sifted flour and mix well.

9. Pour the batter into the prepared loaf pan.

10. Bake at 175 degrees celsius for 1 hour or until a skewer inserted in the middle of the banana loaf comes out clean.

11. Cool thoroughly before slicing to serve.

Monday, January 18, 2010

crunchy peanut butter cookies

I love to eat peanut butter, especially the type that comes with chunky pieces of chopped peanuts. However, Da is not fond of peanut butter. As such, we try not to buy peanut butter because I am the only one who ends up eating the peanut butter and it takes me quite a long time to finish a small bottle.

I have since found a way to "have my cake and eat it"! So as not to miss out on my chunky peanut butter, some of the peanut butter gets spread onto bread or crackers. The rest of the peanut butter is used to make peanut butter cookies.

If you are keen on making peanut butter cookies, I would recommend that you use icing sugar instead of castor sugar or brown sugar. The inclusion of icing sugar gives the cookie a very fine texture and the cookie tends to melt in your mouth. Ooh-la-la! If, however, you would prefer that the cookie be more firm, then by all means, use castor sugar or brown sugar instead of icing sugar. At the end of the day, it is all about personal preference.

Ingredients

2 1/4 cups plain flour
1 tsp bicarbonate of soda
1 tsp salt1 cup butter (softened)
1 1/2 cups icing sugar
1 tsp vanilla essence
2 eggs
1 tsp ground cinnamon
1/2 cup ground peanut
2 cups chunky peanut butter
1 cup chopped peanuts

Method

1. Preheat the oven to 180 degrees celsius.

2. Sift the plain flour and bicarbonate of soda. Add the salt and mix well.

3. Cream the butter, icing sugar and vanilla essence till light and fluffy.

4. Add the eggs, 1 at a time and beat well.

5. Add the ground cinnamon, ground peanut, peanut butter and chopped peanuts and mix well.

6. Fold in the flour and salt mixture.

7. Drop by teaspoonful onto a baking tray lined with baking paper.

8. Bake for 20 minutes or until golden brown.

9. Cool the cookies thoroughly before storing in an air-tight container.


Tips

If you prefer that the cookies have a firmer texture:-

(a) instead of 2 1/4 cups of plain flour, use 2 cups of plain flour and 1/4 cup of corn flour; and

(b) instead of 1 1/2 cups of icing sugar, use 1/2 cup of castor sugar and 1 cup of brown sugar.

Saturday, January 16, 2010

apple cake with mixed fruits

I have stumbled upon a tip for moist cake - use fruit puree. It all started when I had some balance Heinz apple puree. So as not to waste it, I added it to my cake batter (as part of the liquid) and I was pleasantly surprised at how moist the cake turned out to be.

Ever since we bought a Philips hand grinder, I have been making my own fruit and vegetable puree. Not only can the puree be used as baby/infant food, the puree also comes in handy as a dip or as an ingredient for my cakes and bread.

INGREDIENTS

3 cups self-raising flour
1/2 tsp salt
1/4 tsp ground cinnamon
1 cup castor sugar
1 cup vegetable oil
1 cup apple puree
1 cup apple juice
1/2 cup dried mixed fruits

METHOD

1. Preheat the oven to 180 degrees celsius.

2. Grease and flour a bundt pan. Set aside.

3. Sift the self-raising flour, salt and ground cinnamon in a bowl. Set aside.

4. Mix the castor sugar, oil, apple puree and apple juice in a bowl using a hand whisk.

5. Add the flour mixture and whisk until evenly blended.

6. Stir in the dried mixed fruits and mix well.

7. Pour into the prepared pan and bake for 40 minutes or until the skewer near the middle of the cake comes out clean.

Thursday, January 14, 2010

otah patties

Frozen otah is very versatile. I have to date used it in my cooking as follows:-
(a) baked / steamed on its own
(b) otah casserole
(c) otah pizza
(d) otah bread

I have now added another item to the list - otah patties.

Most patties require deep frying. However, I am not fond of deep frying as it makes our home smokey and it is not as healthy as baking. As such, I decided to create baked otah patties by adding Bisquick pancake and baking mix instead of plain flour or corn flour.

INGREDIENTS

2 pcs frozen otah
1 stick celery
1/3 green capsicum
1/4 red onion
1 small potato
1/2 small carrot
4 dried mushrooms (soaked)
4 button mushrooms
4 pcs cut young corn
4 cherry tomatoes
1/4 cup green peas
salt and pepper to taste
2 eggs
1 1/4 cup Bisquick pancake and baking mix

METHOD

1. Preheat the oven to 220 degrees celsius.

2. Cut the celery, green capsicum, red onion, potato, carrot, dried mushrooms, button mushrooms, young corn and cherry tomatoes into small slices. Add the green peas. Microwave these ingredients in some water for 5 minutes on High. Drain off the water.

3. Microwave the frozen otah for 3 minutes on High. Add the egg, salt, pepper and the other vegetables and mix well.

4. Add the Bisquick pancake and baking mix and stir until the Bisquick mix has been blended in.

5. Using an ice-cream scoop, scoop the patties onto a baking tray lined with baking paper.

6. Bake for 7 1/2 minutes on each side of the patties.

Tuesday, January 12, 2010

chocolate pound cake

If you are wondering why the bowl of sliced cake that you see in the photograph above seems to be resting on a warehousing carton, it is because this photograph was taken in the office.

I had baked a chocolate pound cake for my wonderful team in the office who had been hard at work on a big project. I brought the whole cake to the office and passed it to my secretary to slice and distribute.

INGREDIENTS

300g cake flour
1 tsp baking powder
1 tsp bicarbonate of soda
3 tsp cocoa powder
1/2 tsp ground cinnamon
300g butter (softened)
200g castor sugar
100g brown sugar
6 eggs
1/2 cup chopped nuts (I used a mixture of chopped walnuts, chopped pecans and chopped pumpkin seeds)
85ml milk

METHOD

1. Preheat the oven to 175 degrees celsius.

2. Grease and line a 9" round springform pan with baking paper.

3. Sift the cake flour, baking powder, bicarbonate of soda, cocoa powder and ground cinnamon in a bowl. Set aside.

4. Mix the butter, castor sugar and brown sugar using an electric mixer at medium speed for 1 minute.

5. Add the eggs, 1 at a time, each time mixing at medium speed until blended. When all the eggs have been added, mix at medium speed until smooth.

6. Add the chopped nuts and mix well.

7. Gradually add the milk and blend well at low speed.

8. Pour the batter into the springform pan and bake for 55 minutes or until a skewer inserted in the middle of the cake comes out clean.

Sunday, January 10, 2010

mango and banana jam

Whenever I make jam, I do not include preservatives. As such, the shelf-life of the jam tends to be shorter than the commercially-sold jam and I try to consume the jar of jam within a month. I have exceeded a month before and the jam is still fine but it would be advisable to finish consuming the jam as soon as possible.

Whenever mangoes are in season, I would encourage you to buy them. They are very versatile and can be used to make smoothies, desserts, cakes and even jam.

Here is a very simple recipe for mango and banana jam that you may like to try.

INGREDIENTS

1 ripe banana (mashed)
4 mangoes
1 cup castor sugar

METHOD

1. Scrape the pulp from mangoes and mash the mangoes.

2. Add the mashed mangoes and mashed bananas in a cooking pot.

3. Add in the castor sugar.

4. Cook over medium heat, constantly stirring until the jam thickens.

5. Pour the hot jam into glass jars and seal the jars immediately.

6. Leave the jars of jam to cool.

Friday, January 8, 2010

crunchy cheese cookies

For Chinese New Year in 2009, I baked chewy cheese cookies (amongst other goodies) and brought them to Muar, Malaysia. The feedback from some of my relatives was that they would prefer the cheese cookies to be of the crunchy type.

Ta-da! This time, I have baked crunchy cheese cookies. Instead of grating the cheddar cheese, I decided to use sliced cheddar cheese and to cut them into small squares.

INGREDIENTS

400g plain flour
2 tsp baking powder
1/2 tsp salt
1/2 tsp ground cinnamon
325g butter (softened)
180g brown sugar
1 egg (beaten)
6 slices of cheddar cheese (cut into small squares)

METHOD

1. Preheat the oven to 160 degrees celsius.

2. Sift the plain flour, baking powder, salt and ground cinnamon in a bowl. Set aside.

3. Cream the butter and sugar in a mixing bowl until light and fluffy. Add the egg and cheese. Mix well.

4. Fold in the flour and mix until combined.

5. Using both hands, roll the dough into small balls. Place the balls on a baking tray lined with baking paper. Press down the balls using the flat portion of a fork.

6. Bake for 18 minutes or until the cookies are golden brown.

7. Let the cookies cool thoroughly before storing them in an air-tight container.

TIP

If you want a bit of spice in the cookies, you may like to add 1 1/2 tsp of chilli powder when folding in the flour. I omitted it when I baked the cheese cookies as I do not eat chilli (erm... except when it comes to the famous Muar otah....).

Wednesday, January 6, 2010

orange cookies

I have my friend SC to thank for the photographs of orange cookies that you see in this post. She saw a recipe for orange cookies in an online newsletter that she received and she copied and forwarded the recipe to her sister (JT) and me.

Before I baked the orange cookies, I had a look through the recipe and I decided to make some modifications. For example, the recipe requires sugar to be sprinkled on top of the cookies before baking. Given the fact that we can all do with a little less sugar and a little less salt in our diet, I decided to omit the sugar topping. I also made some other modifications to the ingredients and the steps. The recipe in this post is the revised version by me.

INGREDIENTS

1 cup plain flour
1/8 tsp salt
1/2 tsp baking powder
1/2 tsp ground cinnamon
1/2 tbsp ground almond
100g butter (softened)
1/2 cup castor sugar
zest of 1 orange
1 tbsp freshly squeezed orange juice

METHOD

1. Preheat the oven to 175 degrees celsius.

2. Sift the plain flour, salt, baking powder, ground cinnamon and ground almond in a bowl. Set aside.

3. Cream the butter, sugar and orange zest in a mixing bowl until light and fluffy. Add the orange juice and mix until just combined.

4. Fold in the flour mixture and mix well.

5. Wrap the dough in cling wrap and let it chill in the refrigerator for 1 hour.

6. When chilled, roll out the dough on a floured board using a floured rolling pin. Cut using a cookie cutter and place 1" apart on a baking tray lined with baking paper.

7. Bake for 10 minutes or until the cookies are golden brown.

8. Let the cookies cool thoroughly before storing them in an air-tight container.

TIPS

1. It would be preferable to use freshly squeezed orange juice instead of those from a carton. Freshly squeezed orange juice makes the cookies more aromatic. In my case, after I grated the zest of the orange, I sliced the orange and squeezed out the juice. I used 1 tbsp of the juice to make the cookies and I drank the rest of the orange juice (which was very refreshing, by the way!).

2. The dough should be rolled out to about 1/3" to 1/2" thick. Any thinner than that and the cookies tend to burn easily in the oven.

Blog Widget by LinkWithin