Sunday, November 29, 2009

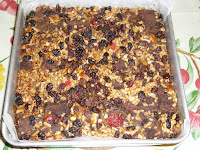
chocolate cake pudding with pudding sauce

I do not know what overcame me when I baked this chocolate cake pudding. This recipe involves quite a few steps but it is worth it. The smell of the cake pudding being baked in the oven is simply heavenly.

INGREDIENTS (for the chocolate cake)

2 cups self-raising flour
2/3 cup cocoa powder
250g butter (softened)
1 3/4 cups brown sugar
2 tsp vanilla essence
3 eggs
1 cup water


INGREDIENTS (for the pudding)

1 large overripe banana (sliced thinly)
1/2 cup chopped peanuts
1/2 cup dry mixed fruit
3 cups low fat milk
3 eggs
2 tbsp brown sugar
1/2 tsp salt
1/2 tsp ground cinnamon
juice of 1 lemon


INGREDIENTS (pudding sauce)

2 cups sugar
1 cup butter (softened)
2 tsp ground cinnamon
2 eggs
2 cups low fat milk


METHOD (for the chocolate cake)

1. Preheat the oven to 180 degrees celsius.

2. Grease and line a 9" x 9" square baking pan with baking paper. Set aside.

3. Sift the self-raising flour and cocoa powder in a mixing bowl. Add the butter, brown sugar, vanilla essence, eggs and water and beat with an electric mixer on low speed until the ingredients are combined. Increase the speed to medium and beat for 3 minutes or until the mixture is smooth and changed in colour.

4. Pour the batter onto the prepared cake pan and bake for 1 1/2 hours or until a skewer inserted in the middle of the cake comes out clean.

5. Let the cake cool thoroughly.


METHOD (for the pudding)

1. Grease and line a 9" x 9" square cake pan with baking paper.

2. Slice the cooled cake cross section into two. Place 1 portion of the cake at the base of the cake pan.

3. Arrange the sliced bananas on top of the cake. Cover the bananas with the other portion of the cake.

4. Sprinkle the chopped peanuts on top of the cake.

5. Sprinkle the dry mixed fruit on top of the chopped peanuts.

6. Beat the milk, eggs, brown sugar, salt, ground cinnamon and lemon juice in a mixing bowl using an electric mixer until well combined. Pour the mixture into the cake pan, making sure that the cake, bananas, chopped peanuts and dry mixed fruit are totally covered.

7. Bake in an oven preheated to 175 degrees for 1 hour.


METHOD (for the pudding sauce)

1. Cream the sugar and butter in a mixing bowl using an electric mixer until light and fluffy.

2. Add the ground cinnamon and eggs and mix well.

3. Boil the milk in a saucepan. Pour the boiling milk into the mixture and stir continuously until well mixed.

4. Serve the cake pudding with a generous serving of the pudding sauce.

Friday, November 27, 2009

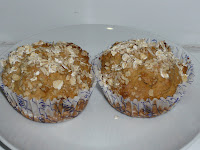
apricot and oat muffins

Oats are known to have health benefits. Studies have found that oats can help lower cholesterol and reduce the risk of heart disease, when combined with a low-fat diet. They have a high content of complex carbohydrates and water-soluble fiber, which helps to keep one full so that one will not snack in between meals.

I personally find it difficult to eat a bowl of hot oatmeal although I have no problems adding a few spoonfuls of rolled oat to my cereal or using oats in my baking (eg. to bake Nestum and oat cookies).

I bought 4 non-stick muffin pans this year and I have developed a muffin craze nowadays. As I had not gone grocery shopping in the past week, I did not have many ingredients at home. I opened the refrigerator and saw two eggs and a few pieces of dried apricots left over from the box of dried apricots that I was given shortly before Chinese New Year this year (the bulk of which I used to bake apricot cookies to bring to my grandmother's home in Muar, Malaysia for Chinese New Year). I checked the larder and saw a tin of instant Quaker Oats which was almost finished. I decided that I might as well use the dried apricot and Quaker Oats to bake muffins.

Ingredients

1 cup self-raising flour
1/2 tsp baking powder
1 cup rolled oats
1/2 cup ground almond
1/2 cup finely chopped dried apricot
3/4 cup milk
1/4 cup honey
60g butter (softened)
1 egg
additional rolled oats (topping)

Method

1. Preheat the oven to 180 degrees celsius.

2. Line two 12-hole muffin pans with muffin paper cups.

3. Sift the flour and baking powder into a large bowl.

4. Add the rolled oats, ground almond and chopped apricots. Mix well.

5. Make a well in the centre of the ingredients in the bowl.

6. In a separate bowl, whisk the milk, honey, butter and egg. Add this to the dry ingredients and mix well using a spatula. The mixture will be lumpy.

7. Spoon the mixture into the muffin paper cups until the paper cups are 2/3 full.

8. Sprinkle the top with rolled oats.

9. Bake for 25 minutes or until a skewer inserted in the middle of the muffin comes out clean.

10. Let the muffins cool before you store them in an air-tight container.
Wednesday, November 25, 2009

mango bread

I had originally planned to bake a honey spice bread. However, I decided to use the ripe mango that was in our refrigerator and bake mango bread instead. Da and I had bought the mangoes a week earlier when the mangoes were on sale. As I had not yet decided at the time what to do with the mangoes, I put the mangoes in the refrigerator first to slow down the ripening process.

As this was a "trial and error" baking session, I was not sure how the bread would turn out. Would it be sweet? Would there be any taste of mango in the bread?

The verdict? The bread was not overly sweet and there was a hint of mango taste. If you prefer that the taste of the mango be more evident, you may want to use two mangoes instead of one mango.

INGREDIENTS

1 cup plus 1 2 tbsp low fat milk
1 tbsp butter
1 1/2 tsp honey
1/2 tsp salt
1 large ripe mango (cut into small cubes)
3 cups bread flour
2 tsp instant dry yeast

METHOD

1. Place all the ingredients (except the bead flour and the yeast) in the bucket of the breadmaker machine.

2. Add the bread flour, making sure that the wet ingredients are totally covered.

3. Add the yeast.

4. Place the bucket in the breadmaker machine and set to "dough" cycle.

5. When the cycle has been completed, turn the dough onto a floured board. Using floured hands, knead the dough about 5 times.

6. Place the dough in an 8" x 5" loaf pan that has been greased and lined with baking paper. Spread out the dough to reach the sides of the loaf pan.

7. Cover the loaf pan with a damp cloth and leave for 1 hour or until the dough has doubled in size.

8. Bake at 190 degrees celsius for 35 minutes.

Tuesday, November 24, 2009

apple and carrot cake

I like the non-stick bundt pan that Da and I have. Whenever I bake cakes using the bundt pan, the cake rises very evenly. My oven has two heating elements - one on top and one below. There is also a fan at one side of the oven and as such, whenever I use disposable aluminium cake pans, the cake tends to rise in the direction of the fan.

If you prefer muffins to cakes, you can use this recipe and bake muffins instead. The muffins would need to be baked in an oven preheated to 180 degrees for 20 minutes or until a skewer inserted in the middle of the muffin comes out clean.

Although the top of the cake looks quite dark in the photographs in this blog, the cake is actually moist and soft. Do give this recipe a try.

INGREDIENTS

2 cups plain flour
1 tsp bicarbonate of soda
1 1/2 tsp baking powder
1/2 tsp salt
1 1/2 tsp ground cinnamon
1 1/4 cups brown sugar
3/4 cup peanut oil
1 1/2 tsp vanilla essence
3 eggs
1 large red apple (grated)
1 large carrot (grated)
1/2 cup pecans (chopped)

METHOD

1. Preheat the oven to 180 degrees celsius.

2. Grease and flour a bundt pan. Set aside.

3. Sift the plain flour, bicarbonate of soda, baking powder, salt and ground cinnamon in a bowl. Set aside.

4. Combine the brown sugar, peanut oil and vanilla essence in a mixing bowl using an electric mixer until evenly mixed. Stir in the apple, carrot and pecans.

5. Fold in the flour mixture to the wet ingredients and stir until just combined. Do not over-stir.

6. Pour the batter into the prepared pan.

7. Bake for 55 minutes or until a skewer inserted near the middle of the cake comes out clean.

TIP

When you grease and flour the bundt pan, be generous with the butter and flour so that the baked cake can be removed from the bundt pan easily.

Monday, November 23, 2009

potato bread

When Da's and my godchildren came to our home on 17 June 2009 for a baking session, I had originally intended to teach them how to bake a simple loaf of potato bread. However, when they saw the dough in the breadmaker machine, they requested if they could make pizza using the dough instead.

Improvisation is important when it comes to baking or cooking. Sometimes, you may suddenly realise that you do not have a particular ingredient. Or you may change your mind halfway during the cooking or baking process and create something else instead.

INGREDIENTS

3 large potatoes
1/2 cup reserved potato water (lukewarm)
2 tsp salt
2 tbsp olive oil
1 tsp Italian herbs / mixed herbs
4 3/4 cups bread flour
2 1/2 tsp instant dry yeast


METHOD

1. Peel off the skin of the potatoes and cut the potatoes into small cubes. Place the potatoes in a saucepan and add enough water to cover the potatoes. Boil the potatoes until they are soft. Drain off the water (reserving 1/2 cup) and mash the potatoes.

2. When the mashed potato has cooled down, place all the ingredients (excluding the bread flour and yeast) in the bucket of the breadmaker machine.

3. Add the bread flour, making sure that the wet ingredients are totally covered.

4. Add the yeast.

5. Place the bucket in the breadmaker machine and set to "dough" cycle.

6. When the cycle has been completed, turn the dough onto a floured board. Using floured hands, knead the dough about 5 times.

7. Place the dough in a 10" x 7" loaf pan that has been greased and lined with baking paper. Spread out the dough to reach the sides of the loaf pan.

8. Cover the loaf pan with a damp cloth and leave for 1 hour or until the dough has doubled in size.

9. Bake at 180 degrees celsius for 35 minutes.

VARIATION

If you want to bake the pizza that you see in the photographs in this post, instead of placing the kneaded dough in a loaf pan, place the dough in a 11" x 5" baking tray that has been lined with baking paper. Cover the baking tray with a damp cloth and leave for 1 hour or until the dough has doubled in size. Arrange ingredients of your choice (my godchildren used a can of sliced button mushrooms, a can of tuna in olive oil and seasoned seaweed and topped the pizza with mozarella cheese and bacon bits) on top of the pizza and bake at 190 degrees celsius for 35 minutes.

Sunday, November 22, 2009

walnut coated cookies

If you have some time to spare, do give this recipe a try. It is not complicated but would require a 4-step preparation, that is, shaping of the dough into a ball, dipping of the dough into egg white, coating the dough with crushed walnuts and pressing the dough onto the baking tray.

To achieve the size of the cookies that you see in this post, each cookie dough is one teaspoonful. When my mother bought Da and me a Hitachi breadmaker as a wedding gift in 1998, the breadmaker came with a spoon that had two ends - one of the ends was a tbsp and the other end was a tsp. Each end was a round spoon (instead of the usual spoons that are flatter), which is very useful to scoop out dough to be shaped into balls.

INGREDIENTS

2 cups plain flour
1/2 tsp salt
1/4 tsp ground cinnamon
1 cup butter (softened)
1/2 cup brown sugar
2 egg yolks
2 tsp vanilla essence
2 egg whites (lightly beaten)
200g crushed walnuts

METHOD

1. Preheat the oven to 190 degrees celsius.

2. Sift the plain flour, salt and ground cinnamon in a bowl. Set aside.

3. Cream the butter, brown sugar, egg yolk and vanilla essence in a large mixing bowl.

4. Fold in the flour mixture and mix until the flour is blended into the mixture.

5. Scoop 1 tsp of dough and shape into a ball.

6. Coat the shaped dough with lightly beaten egg white.

7. Roll the shaped and coated dough in crushed walnuts.

8. Place the dough on a baking tray lined with baking paper. Press the dough to slightly flatten it.

9. Bake for 13 minutes.

10. Let the cookies cool before storing them in an air-tight container.

Saturday, November 21, 2009

zi zhoh (sweet potato kueh)

(This post is specially dedicated to my maternal grandmother. Be at peace, Mama. We are all doing fine - do not worry.)

Whenever I mention the snack "Zi Zhoh" to anyone other than my Malaysian relatives, I am often met with a "Huh? What is that?" response. I do not know the English name for this snack. The closest that I can come up with is, for want of a better name, "sweet potato kueh".

According to my maternal grandmother, the recipe for "Zi Zhoh" hails from China. The ingredients are simple (sweet potato being the main ingredient) and the snack is filling (as glutinous rice flour is used). The process of making the snack is very labour intensive (as the dough is very dense), a testimony to the diligence of the migrants who came from China in the early 20th century to settle in Singapore and Malaysia.

The recipe that I am going to post below is as per what my grandmother gave me, which requires 3 kg of sweet potato. For Chinese New Year this year, I bought 5 kg of sweet potato to make the "zi zhoh" to bring to Muar, Malaysia. If this is the first time that you are making "Zi Zhoh", my suggestion would be to start small (eg. 500g of sweet potato) as the process of mixing the mashed sweet potato with the glutinous rice flour can be exhausting (as the mixture is very dense) and I do not want your first experience making "Zi Zhoh" to put you off making "Zi Zhoh" again due to a sore arm.

Ingredients
3 kg sweet potato
600g glutinous rice flour
400g sugar
1 pkt uncooked bee hoon (rice vermicelli)
oil for frying

Method

1. Scrub the skin of the sweet potato to remove the dirt. Place the sweet potato (with the skin intact) in a big pot and cover the sweet potato with water. Boil the sweet potato until it has softened.

2. Using a butter knife, peel off the skin of the sweet potato.

3. Mash the sweet potato (without the skin) until there are no more lumps.

4. Add the glutinous rice flour and sugar to the mashed sweet potato and mix thoroughly.

5. Using your hands, roll out some of the dough into the shape of a bolster.

6. Deep fry the "Zi Zhoh" in medium heat.

7. When the "Zi Zhoh" is golden brown, remove the "Zi Zhoh" from the frying pan and drain off the excess oil.

8. Place the uncooked bee hoon (rice vermicelli) at the bottom of a large pot. Arrange the fried "Zi Zhoh" on top of the uncooked bee hoon (rice vermicelli).

9. Use a dry cloth (instead of a lid) to cover the pot.

Tips

1. According to my grandmother, when you fry the "Zi Zhoh", you are not supposed to count the "Zi Zhoh" as you are frying it. The belief is that if you count as you fry, the "Zi Zhoh" will turn mouldy soon. For me, regardless whether I believe in this superstition, I conscientiously avoid counting when I am frying the "Zi Zhoh". After all the work in making the "Zi Zhoh", I am not about to take the risk of the "Zi Zhoh" turning mouldy!

2. If you are using your hand to take the "Zi Zhoh" from the pot to eat, make sure that your hand is dry. If you are using a fork or a pair of chopsticks, make sure that the utensil is dry as well. Moisture in the pot can turn the "Zi Zhoh" mouldy.

3. The older folk will not eat the "Zi Zhoh" on the day that it is fried because the use of glutinous rice flour makes the snack "heaty" and older folk tend to get sore throat if they eat the "Zi Zhoh" fresh from the frying pan. As such, they tend to eat the "Zi Zhoh" overnight. If you keep the pot of fried "Zi Zhoh" in a cool place, it can last for several days without refrigeration and the "Zi Zhoh" will remain soft.

4. There are many types of sweet potato that are sold at the wet markets and supermarkets. The most ideal type would be the slim and long sweet potato that is very deep orange in colour. These tend to cost more but it is worth it because "Zi Zhoh" made using this type of sweet potato is very sweet and soft.

5. As an alternative to steps 1 and 2 of the method above, you can peel off the skin from the sweet potato before you steam the sweet potato until the sweet potato has softened. The rest of the steps remain the same.

6. If you deep fry the "Zi Zhoh" in high heat, the outside of the "Zi Zhoh" will burn before the inside has cooked. If you deep fry the "Zi Zhoh" in low heat, the fried "Zi Zhoh" tends to stick together. As such, I would recommend that you use medium heat to deep fry the "Zi Zhoh".

7. When the "Zi Zhoh" has cooled down, it will flatten but remain soft. The sweet potato kueh that you may be able to buy commercially tends to retain its shape because it contains more flour than sweet potato.

Friday, November 20, 2009

sour cream coffee cake

I am getting the hang of adding sour cream to cake recipes. It makes the cake soft and moist.

You can vary the recipe in this post by adding some streusal to the cake. What you would need to do is to pour 1/2 of the batter into the prepared cake pan, add 3/4 of the streusal, pour the balance batter and then sprinkle the remaining streusal on top. If you wish to add streusal, you would need to use a ring pan instead of a bundt pan.

INGREDIENTS

2 1/2 cups cake flour
2 tsp baking powder
1/2 tsp bicarbonate of soda
1/2 tsp salt
175g butter (softened)1
1/2 cups brown sugar
3 eggs
1 1/2 tsp orange essence
250g sour cream (softened)

METHOD

1. Preheat the oven to 175 degrees celsius.

2. Grease and flour a bundt pan. Set aside.

3. Sift the cake flour, baking powder, bicarbonate of soda and salt in a bowl. Set aside.

4. Cream the butter and sugar in a mixing bowl using an electric mixer until light and fluffy. Add the eggs, 1 at a time, mixing well with each addition. Add the orange essence and sour cream and mix well.

5. Fold in the flour mixture and mix until combined.

6. Pour the batter into the prepared pan and bake for 50 minutes or until a skewer inserted in the middle of the cake comes out clean.

TIP

If you wish to add streusal, you would need to place in a bowl 1/4 cup brown sugar, 1/2 cup plain flour, 1 1/2 tsp ground cinnamon, 1 1/4 tsp salt and 3 tbsp cold butter (cut into small pieces). Using your fingers, mix the ingredients until it comes crumbly. Stir in 3 1/4 cup chopped walnuts and mix well.

Thursday, November 19, 2009

yoghurt doughnuts (baked)

I have finally managed to find a doughnut baking tray being sold at a shop at Seah Street that sells baking paraphernalia. Each tray cost S$7. I decided to buy two trays (in any event, there were only two left on the shelf!). The tray is non-stick, which is quite a good deal considering the price. I can finally bake doughnuts! The problem with commercially sold doughnuts are that they are deep fried and hence not so healthy.

To give the doughnuts some flavour, I added yoghurt drink to the batter. I used a non-fat tropical mixed fruit yoghurt drink but do feel free to substitute this with any other flavour of your choice.

INGREDIENTS

1 cup self-raising flour
1/3 cup castor sugar
1/2 tsp bicarbonate of soda
1/4 tsp salt
1 egg
90ml yoghurt drink
1 tbsp sunflower oil

METHOD

1. Preheat the oven to 200 degrees celsius.

2. Grease the doughnut baking tray with some margarine or oil.

3. Sift the self-raising flour, bicarbonate of soda and salt into a mixing bowl. Add the sugar and mix well.

4. In a separate bowl, mix the egg, yoghurt drink and sunflower oil. Pour this mixture into the flour mixture. Using a spatula, stir the batter until the flour is incorporated into the batter. Do not over-mix. The batter will be lumpy.

5. Fill the doughnut baking tray till half-full.

6. Bake at 200 degrees celsius for 7 minutes or until a skewer inserted near the centre of the doughnut comes out clean.

7. Let the doughnuts cool in the doughnut baking pan for 5 minutes before transferring the doughnuts onto a wire rack to cool thoroughly.

8. Store the doughnuts in an air-tight container.
TIPS

1. As my doughnut baking pan makes mini-doughnuts, the baking time is about 7 minutes. If your doughnut baking pan makes larger doughnuts, bake the doughnuts for about 10 minutes or until a skewer inserted near the middle of the doughnut comes out clean.

2. The baked doughnuts are delicious on their own and there is no necessity to glaze the doughnuts. If you prefer, sprinkle cinnamon sugar onto both sides of the doughnut while it is still hot and leave the doughnuts on a wire rack to cool.

3. If you wish to glaze the doughnuts, mix 1 cup of icing sugar with 2 tbsp of milk in a small bowl. Dip one side of the doughnut into the glaze and decorate the glazed side of the doughnut with chocolate rice, rainbow sprinkles or any other toppings of your choice. Remember to place the doughnuts onto a wire rack (glazed side up) after glazing to allow any excess glaze to drip.

Wednesday, November 18, 2009

light chocolate bread

I need to buy a bigger loaf pan. The one that I have has an 8" x 5" x 3" dimension. When I made this chocolate bread, the dough rose so much that it rose above the edge of the pan. That is why the sliced bread has the same shape as that of a slice of button mushroom!

If you like chocolate, you will like this chocolate bread. Unlike other chocolate bread recipes that use cocoa powder, this recipe uses chocolate chips. As you can see from the photograph above, the chocolate chips will blend into the dough and create an even chocolate texture. The bread is very soft and very delicious.


Ingredients

1 cup water
2 tbsp water
2 tbsp butter
1/2 tsp vanilla essence
3/4 cup semi-sweet chocolate chips
3 tbsp brown sugar
1 tbsp dry milk
1 tsp ground cinnamon
3 cups bread flour
1 1/2 tsp instant dry yeast


Method

1. Place all the ingredients (except the bread flour and the yeast) in the bucket of the bread maker machine.

2. Add the bread flour, making sure that the wet ingredients are totally covered.

3. Add the yeast.

4. Place the bucket in the bread maker machine and set to "dough" cycle. Start the cycle.

5. When the "dough" cycle has been completed, turn the dough onto a floured board. Using floured hands, knead the dough for another 5 minutes to remove any excess bubbles.

6. Place the dough in a loaf pan that has been greased and lined with baking paper.

7. Cover the pan with a damp cloth and leave for 1 hour or until the dough has doubled in size.

8. Bake in an oven preheated to 175 degrees for 50 minutes.

9. Let the bread cool thoroughly before slicing.


Tip

I used an 8" x 5" x 3" loaf pan. The dough rose above the pan and I ended up with bread that, when sliced, has a shape similar to that of sliced button mushroom. If you do not like the shape of the sliced bread that you see in the photographs above, do use a bigger loaf pan so that the dough will not rise above the edge of the pan.

Tuesday, November 17, 2009

vegetarian yee sang

Yee Sang is a raw fish salad that is traditionally eaten during Chinese New Year. It comprises strips of raw fish (such as salmon) mixed with shredded vegetables and a variety of sauces and condiments.

The Chinese are superstitious people. The Mandarin name for this dish is "yú shēng" (鱼生), which sounds like "yú shēng" (余升) (which means "an increase in abundance"). Therefore, this dish symbolises abundance and prosperity.

The fish and shredded vegetables are arranged neatly on a round plate before the sauces and condiments are sprinkled / poured over the fish and shredded vegetables. When you are ready to each the Yee Sang, each person uses a pair of chopsticks to toss the Yee Sang (see photograph at the top of this post). It is customary during the tossing of the Yee Sang to shout auspicious words such as "prosperity", "bonus", "increment in salary", "fertility", etc.

Nowadays, pre-packed sauces and condiments for Yee Sang are commonly sold at supermarkets.

If you were to buy the pre-packed sauces and condiments for the Yee Sang, all you need to do is to shread some vegetables (such as carrots and white radish) and add some slices of raw fish (such as salmon) and you are ready to toss the Yee Sang at home.

As my mother's eldest sister (Tuayi) is a vegetarian, she prepares her own Yee Sang. She also makes her own sauce for the Yee Sang. During Chinese New Year this year, I managed to obtain the receipe from Tuayi.

Ingredients (for the sauce)

1/2 bottle plum sauce
2 tbsp molasses
water


Ingredients (for the salad)

carrots
turnip
white radish
cucumber
lettuce
olive oil
freshly squeezed lime juice
ground peanuts
"tan san"
sesame seeds (toasted)
ground white pepper
5-spice powder

Method (for the sauce)

1. Mix the plum sauce and molasses in a pot.

2. Add enough water to form a smooth paste that is not too watery.

3. Cook the sauce over a stove until it has boiled.

4. Let the sauce cool down.


Method (for the Yee Sang)

1. Remove the skin from the carrots, turnip, white radish and cucumber. Also remove the centre portion of the cucumber.

2. Cut the carrots, turnip, white radish, cucumber and lettuce into thin strips.

3. Arrange the vegetables onto a large round plate.

4. Pour olive oil and freshly squeezed lime juice over the Yee Sang.

5. Sprinkle the ground peanuts, "tan san", toasted sesame seeds, ground white pepper and 5-spice powder over the Yee Sang.

6. Using chopsticks, toss the Yee Sang as high as you can, shouting auspicious words (eg. "prosperity", "peace", "happiness", "fertility", blessings", "salary increment", "good bonus", etc) as you are tossing the Yee Sang.

7. When the Yee Sang has been well tossed, enjoy!

Monday, November 16, 2009

banana cookies

Da and I had two remaining overripe large bananas at home. I wanted to try something different (instead of the usual banana muffin, etc) and I surfed the internet for recipes. I had in mind to bake some cookies using the bananas although I have to admit that I have not come across banana cookies before. There is always a first time for everything, isn't it?

As it turned out, I came across a recipe for banana cookies in Simply Recipes. After I made a batch of cookies using the recipe that I found, I have made some modifications to the recipe. This is because my family and I prefer crunchy cookies instead of chewy cookies. The secret to crunchy cookies is the inclusion of corn flour, something that is not common in Western cookie recipes.

INGREDIENTS

1 1/2 cups plain flour
1/2 cup corn flour
1/4 tsp salt
1 tsp ground mixed spice
125g butter (softened)
1 cup brown sugar
1 egg
1 tsp banana essence
2 large bananas (mashed)
1/2 cup chopped pecans
1/2 cup chopped peanuts

METHOD

1. Preheat the oven to 190 degrees celsius.

2. Sift the plain flour, corn flour, salt and mixed spice in a bowl. Set aside.

3. Cream the butter and brown sugar in a mixing bowl using an electric mixer until light and fluffy. Add the egg and mix well. Add the mashed bananas and banana essence and mix until smooth.

4. Fold in the flour mixture and add the chopped nuts. Stir using a wooden spatula until evenly mixed.

5. Place by spoonfuls onto a baking tray lined with baking paper.

6. Bake for 15 to 20 minutes or until the cookies are golden brown.

Blog Widget by LinkWithin