Showing posts with label dishes. Show all posts

Saturday, August 9, 2014

bread casserole


I love to bake bread and I love to eat bread.  The problem is that I sometimes go overboard with the baking of bread and I end up with leftovers that the family cannot finish.

What do I do with the leftover bread?


This is a perfect recipe to use when you have leftover bread and a bit of this and a bit of that in terms of ingredients.  Toss everything together and you get a wonderful bread casserole!

Note: This recipe yields a substantial casserole, so do cut down the recipe if you wish to bake a smaller casserole.


INGREDIENTS

8 eggs
2 cups low fat milk
2 cups grated mozarella cheese
freshly ground black peppercorn (to taste)
freshly ground white peppercorn (to taste)
freshly ground sea salt (to taste)
1 tsp dried mixed Italian herbs
assorted ingredients (I pretty much add whatever is available in the kitchen, eg. sausage, mixed greens, frozen spinch, ham, surimi, fresh Shitake mushrooms, onions, etc)
6 slices thick bread (cut into large cubes)


METHOD

1. Preheat the oven to 180 degrees celsius.

2. Line a 13" x 9" casserole dish (or, in this case, I used a 9" x 9" square baking pan) with aluminium foil. Set aside.

3. Beat the eggs in a large bowl until frothy.

4. Add the milk and cheese and mix well.

5. Add the black peppercorn, white peppercorn, sea salt, mixed dried Italian herbs and ingredients and mix well.

6. Add the bread and carefully stir until all pieces of bread are moistened (do not overmix otherwise the bread may disintegrate).

7. Pour into the prepared casserole dish / baking pan.

8. Bake for 50 minutes to an hour, until the top is browned and the centre springs back when touched.

9. Remove from the oven and let cool for 10 minutes before serving.


TIPS

This casserole goes well with a bit of Dijon mustard or tomato sauce by the side.

Saturday, May 24, 2014

braised chicken drumsticks


I have good news and bad news.

The good news is that these braised chicken drumsticks were so yummy that there were no leftovers for me when I got home late from a work meeting today.  

The bad news is that I had not had dinner yet when I got home.

I did not get the opportunity to take more photographs other than the above photograph that I took when I was cooking the drumsticks.  Sob, sob....

So this recipe is a keeper.  In fact, I'm toying with the idea of making variations of this.  Let's see how things progress... So far, I am more adventurous in varying baking recipes as compared to cooking recipes but there's always a first time.


INGREDIENTS (marinade)
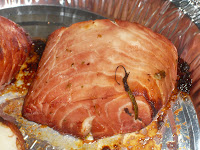
2 tbsp honey
1/2 tbsp oyster sauce
1 tsp sesame oil
1/2 tsp light soya sauce
4 cloves of garlic (whole)


OTHER INGREDIENTS

6 chicken drumsticks
1 bay leaf
1 carrot (cut into chunks)
1 stick celery (cut into big pieces)
1 carrot (cut into large cubes)
4 dried mushrooms
1 red onion (quartered)
4 cherry tomatoes


METHOD

1. In a large bowl, mix the marinade well.

2. Add the other ingredients and mix with the marinade.

3. Refrigerate for at least an hour (preferably overnight).

4. Cook in a slow cooker or a rice cooker with soup function (select the soup function).

5. Serve piping hot with steamed white rice.

Saturday, January 4, 2014

broccoli, sausage and bacon quiche


I ate my first quiche in a Delifrance cafe years ago and I have been hooked since.  I find that quiche is simply yummy.

It was only years later that I started baking my own quiche. When I did so, I realised that it was not all that difficult to make and you have a lot of freedom in terms of the filling that you want to use.

I baked this quiche for a small gathering at a friend's place today. What was the occasion? Well, I guess it was a belated Christmas gift exchange (for the kids) and an opportunity for the adults to catch up over the New Year.

With Baby Chickadee having just started childcare on 2 January 2014, I have not had the time to do grocery shopping lately. Fortunately, one of my colleagues frequently passes around an order list for those of us who wish to order sausages, bacon, ham, etc. The supplier will deliver the items to our office. I always place an order whenever the order list is passed around. I understand that the price is cheaper than if you were to buy the item from the supermarket. More importantly, I appreciate the convenience of having my order delivered "right to my doorstep".

As such, for today's quiche, I made use of whatever I could find in my refrigerator and freezer. I happened to have the broccoli florets because I just used the stem to cook stock for the girls a week ago.


INGREDIENTS

4 eggs
1 1/2 cups low fat milk
3 tbsp butter (softened)
1/2 cup self raising flour
1 1/2 cups grated mozzarella cheese
2 cups ingredients - I used broccoli florets, pork cocktail sausages, crab stick and back bacon (all cut into small pieces)
freshly grated mixed peppercorn (to taste)


METHOD

1. Preheat the oven to 180 degrees celsius.

2. Line an 8" round baking pan with baking paper.  Set aside.

3. In a large mixing bowl, whisk the eggs, milk, butter and flour using a hand whisk.

4. Add the cheese, filling and freshly grated mixed peppercorn and mix well.

5. Pour into the prepared pan and bake for 40 minutes.


TIPS

1. I used to grease the baking pan before I lined it with baking paper. I no longer do that to cut down on the oil.

2. If you do not have mixed peppercorn, you can use black peppercorn too. I personally prefer to buy the whole peppercorn and grate it when I need to use it, instead of those pre-ground ones.  Fresh is best!

3. If you like, you can sprinkle additional grated mozzarella cheese on top of the mixture before you bake it. I did not do that today because I used up all my cheese in the mixture. It is time to do grocery shopping again!

Tuesday, November 8, 2011

slow cooker dhal

Several years ago, Da's friend, SNC (the Lord bless his soul) taught me his "secret recipe" for dhal. SCG hailed from Seremban in Malaysia and he had migrated to Perth, Australia for many years and was by then an Australian citizen. He cooked the most mouth-watering Indian dishes.

Each year whenever Da and I visited Perth, SNC would always extend to us the hospitality of his home. Each night, I looked forward to my cooking lessons with SNC. The cheeky guy once tried to "trick" me by adding one piece of chilli (which he probably chopped to tiny pieces) to his fried hor fun and then telling me with a straight face that the dish contained no chilli. Believing him, I took a hearty bite of my plate of fried hor fun, then I burst out laughing and turned accusing eyes at him. He shook his head in disbelief that I could taste the chilli. *grin*

Without fail, each visit to SNC would also mean a visit to his dearest friends, GB and YB who live in Fremantle, Australia. SNC's and GB's friendship went back a long way, to the days when SNC was still a student in Perth, Australia. Today, GB has mastered the skill of cooking curry dishes and the gang fondly talks about "curry in a hurry". Da and I have tried GB's curry dish and it is delicious. GB and YB live in a very old house in Fremantle which they are renovating by building an extension to their house. By "extension", I mean an additional part to the house that is large enough to be another house of its own! The amazing thing is that GB is building the extension himself! The project has taken the couple several years (it started before SNC passed away). Recently, YB told me that the extension is expected to be ready at the end of this year. I look forward to this.

Over the years, I have cooked dhal several times and I must confess that each time, there is always room for improvement (it just never seemed to taste exactly like the dhal that SNC cooked!). When I get round to buying the ingredients for a complete dish of dhal, I shall post SNC's recipe. Although SNC passed away suddenly in 2004, till today, I have kept a printout of an electronic mail from him where he gave me tips on how to improve my dhal.

There are, however, days when you just feel like a simple dish of dhal, without "all the works", accompanied by crusty bread. This is when your slow cooker will come in useful. The recipe in this post serves 2 persons.

INGREDIENTS

1/2 cup yellow lentils (soaked in water and drained)
2 cups water
1 large potato (cubed)
1/2 cup mixed greens
4 dried Chinese mushrooms (soaked and sliced)
2 pcs mock crab stick (sliced)
1 stick cinnamon
4 pcs dried cloves
1 pc star anise
2 tbsp sambar powder (note: it is "sambar" and not "sambal")
1 tsp ground tumeric
salt and pepper to taste

METHOD

1. Place all the ingredients in your slow cooker (except the salt and pepper) and stir thoroughly.

2. Cover with the lid and cook on LOW for 4 hours or until the lentils have softened and the gravy has thickened.

3. When the lentils have softened, add the salt and pepper to taste. Also add more water if the gravy is too thick.


TIP

The gravy of dhal has a thick consistency and according to SNC, there is only one way to thicken the gravy if you have added too much water - by adding some more potatoes. However, the fresh batch of potatoes would take time to cook and thicken the gravy. As such, the trick is not to start with too much water because you can add more water later if the gravy is too thick.

Tuesday, December 14, 2010

pork porridge

It is easy to cook porridge for your little one. The advantage of cooking your own porridge instead of buying them from the stalls outside is that you never know whether the hawkers add MSG to the cooking.

I boil my own stock and use the stock to cook porridge or pasta for Princess.


Ingredients

500ml stock
2 tbsp uncooked white rice
125g minced pork


Method

1. Pour the stock in the pot

2. Rinse the rice and add to the stock.

3. Cook the porridge.

4. When the porridge is about done, stir in the minced pork and mix well,


Tips

1. There is no hard and fast rule when it comes to cooking the stock. You can use pork (I have recently switched from pork bone / pork ribs to muscle meat because it is less oily), threadfin bones, chicken bones, broccoli, tomato, baby spinach, baby chye sim, potato, carrot, corn, celery, lotus root, red onion, dried scallop, wolfberries, etc. I do not add salt or seasoning to the stock because the stock is very tasty due to the ingredients that I add to the stock. Remember to strain the stock before you portion out the stock and freeze them.

2. I prefer to buy the pork from the butcher in the wet market and ask the butcher to mince the pork for me. If you inform the butcher that you intend to feed the pork to a baby/toddler, the butcher will mince the pork twice so that it is more fine. I prefer not to buy ready-minced pork as these tend to contain fat.

Monday, December 6, 2010

mock shepherd's pie

If often amazes me how much favour is shown to us by others. There are a few eating establishments that my family and I like to patronise. I have noticed that the more often we eat there, the larger our meal portions get.

When Da bought a packet of vegetarian noodles from a coffee shop for me, the stallholder gave us so much ingredients that one look at the portion and I knew that I would not be able to finish eating the noodles if I ate all the ingredients. So as not to waste the food, I scooped out some of the ingredients and put them in a separate bowl.

I used the leftover ingredients to make mock shepherd's pie. Shepherd's pie is a meat pie with a crust made from mashed potato. Traditionally, this dish was a means of using leftover roasted meat and the pie dish was lined with mashed potato as well as having a mashed potato crust on top (source: Wikipedia).


Ingredients

*leftover ingredients
3 large potatoes
2 tbsp butter
1/2 tbsp bacon bits
milk
salt (to taste)
pepper (to taste)

(* For the mock shepherd's pie that I made, I used a bowl of leftover ingredients from my vegetarian noodles (without the noodles) and a can of braised peanuts.)


Method

1. Cut the leftover ingredients into bite-sized pieces. There should be a little liquid in your ingredients. As such, if you using dry ingredients, you may want to add a little stock. As I added a can of braised peanuts (which already had a bit of liquid in the can), I did not add any more liquid.

2. Arrange the cut ingredients in a casserole dish.

3. Peel the potatoes and boil them until they are soft. Drain off the potatoes and mash them, adding 2 tbsp of butter and some salt and pepper to taste. Add the bacon bits and mix well. Add some milk to give the mashed potato a creamy consistency.

4. Add the mashed potatoes on top of the cut ingredients, spreading out the mashed potatoes until all the ingredients are covered.

5. Bake in an oven preheated to 190 degrees celsius for 30 minutes.

Tuesday, November 16, 2010

cheesy mushrooms

I have my friend SC to thank for this dish. It was one of those "trial and error" experiments that she and I carried out and I must say that we were elated at the results.

SC used her portable roaster to bake the mushrooms but you can use a convection oven as well.


METHOD

fresh white mushrooms
freshly grated sea salt
grated mozarella cheese
butter /margarine

METHOD


1. Remove the stems from the mushrooms.


2. Wash the mushrooms thoroughly. Drain and pat dry.


3. Grease the bottom of a baking pan with butter / margarine.


4. Place the mushrooms (curved side on the bottom) on the baking pan.


5. Sprinkle freshly grated sea salt onto the mushrooms.


6. Using a teaspoon, fill the cavity of the mushrooms with the mozarella cheese.


7. Bake at 230 degrees for 7 1/2 minutes.

Sunday, November 14, 2010

roasted vegetables

Again, I have my friend SC to thank for the "birth" of this dish. When SC came to our home on 8 August 2009 carrying her portable roaster, we had so much fun baking the marinated chicken, marinated pork ribs and marinated salmon that her godmother gave her. We also had a lot of fun using her roaster to bake other dishes that we created on the spur of the moment.

If you do not have a roaster, fret not. It functions like an oven and as such, you can use your convection oven instead.

As we had additional vegetables from our grocery trip, we decided to cut the vegetables into large pieces. I tossed the vegetables in a simple marinade and placed them in a baking pan that was lined with aluminium foil. Into the roaster went the vegetables and what came out were delicious roasted vegetables.

INGREDIENTS


carrot
corn
peas
russet potatoes
tomatoes
green capsicum
yellow capsicum
red capsicum
assorted fresh mushrooms
olive oil
freshly grated sea salt
freshly grated mixed peppercorn
freshly squeezed lemon juice
red cooking wine


METHOD

1. Cut all the vegetables into large pieces.

2. Toss the vegetables with the olive oil, sea salt, mixed peppercorn, lemon juice and red cooking wine.

3. Place the vegetables in a roasting pan (or any cake pan, for that matter) that has been lined with aluminium foil.

4. Bake the vegetables at 230 degrees celsius for 15 minutes.

5. Remove the pan from the oven, stir the vegetables and return the pan to the oven to bake at 230 degrees celsius for another 15 minutes.

Thursday, November 4, 2010

ABC soup

My mother's side of the family has a tradition of cooking ABC soup. Each relative would have his/her own version of ABC soup but what it is essentially is a clear soup with chunky and hearty ingredients.

The ABC soup is a meal in itself - there are carbohydrates (potatoes), proteins (pork ribs or chicken) and vegetables.

I am not certain about the origin of the name of this soup. Perhaps it is because cooking this soup is "as easy as ABC".

I have not included the proportion in this recipe because it is up to individual preference.

INGREDIENTS

pork ribs
hot water
old ginger
potatoes
carrots
corn
red onions
sichuan vegetables
button mushrooms
Chinese dried mushrooms
celery
fish cake

METHOD

1. Cut the rest of the ingredients into large pieces.

2. Fill half the pot with water and bring to a boil.

3. Add the pork ribs, potatoes, carrots, corn and red onions. When the water has boiled, add the rest of the ingredients.

5. When the water has boiled again, reduce the heat and simmer until the ingredients have softened.

Tuesday, October 5, 2010

baked pork chop

When WC and SC came to our home for a roasting session, one of the items that I marinated to be baked in SC's electric roaster was that of pork chops.

Usually, pork chops are pan fried over the stove. However, it was a "no-stove" day for us that day. Only SC's electric roaster, our under-the-stove oven and our table-top Tefal convection oven were used.

As it turned out, the pork chops were very tender and tasty.

You can use this recipe to marinate chicken as well.

INGREDIENTS

2 to 3 pieces of pork
1/4 cup freshly squeezed lemon juice
grated zest of 1 lemon
1 tsp Dijon mustard
1/2 tsp freshly ground sea salt
1/2 tsp freshly ground black peppercorn
2 tbsp honey
2 tbsp light soya sauce
1/2 cup sunflower oil

METHOD

1. Mix the marinade together.

2. Marinate the meat in the marinade and leave overnight.

3. Bake the meat in an oven preheated to 230 degrees for 10 to 15 minutes on each side.


Share

Monday, September 6, 2010

broccoli and ham bread casserole

When I opened the drawer to the vegetable section of our refrigerator, I found some broccoli, nicely washed and separated. As I did not buy any broccoli recently, I wondered who placed the broccoli there. My guess was that it was either my mother or MIL. (Later that night, I found out that it was MIL because she mentioned it when she tasted broccoli in this bread casserole.) Thanks, MIL! The broccoli came in handy!

This is a good recipe to adopt when you have leftover crusty bread / french loaf. When you leave the leftover crusty bread in the refrigerator for a few days, the bread tends to harden and even if you were to toast the bread, it would not taste that nice.

I have to warn you, though, that this bread casserole is substantial and filling. As such, do go easy on the portions when you are slicing the casserole.

INGREDIENTS

3 to 4 slices of crusty bread / french loaf
2 cups low fat milk
4 eggs
3/4 cup Bisquick pancake and baking mix
1/4 cup butter (softened)
1 cup broccoli (chopped)
1 cup ham (cubed)
2 cups shredded parmesan cheese
1 tbsp dried Italian herbs

METHOD

1. Preheat the oven to 190 degrees celsius.

2. Lightly grease a round casserole dish. Set aside.

3. Cut the crusty bread / french loaf into medium sized cubes. Set aside.

4. Mix the milk, eggs, baking mix and butter in a large bowl using a hand whisk. The batter will be lumpy.

5. Add the remaining ingredients (including the bread) and stir using a wooden spatula. Mix well.

6. Pour into the prepared dish and bake for 50 minutes or until the top is golden brown.

Saturday, September 4, 2010

otah bread casserole

This is an easy recipe for you to make use of your leftover bread. You can use any plain bread that you have although I prefer to use french loaf or crusty bread.

The main ingredient in this casserole is Muar otah-otah. My family buys frozen Muar otah in bulk whenever we visit our relatives in Muar, Malaysia.

Although there are many stalls in Muar (and other parts of Malaysia as well as in Singapore, actually) claiming to sell the "famous Muar otah", regular consumers of Muar otah would be able to tell a good Muar otah from a not-so-good one.


INGREDIENTS

2 pieces of frozen Muar otah
2 cups low fat milk
4 eggs
3/4 cup Bisquick pancake and baking mix
1/4 cup butter (softened)
dried parsley leaves
freshly grated black peppercorn
1 cup broccoli flowers (roughly chopped)
1 cup shredded cheddar cheese
2 cups of plain bread (cubed)

METHOD

1. Microwave the frozen Muar otah in a covered dish for 2 minutes. Mix it up with a fork. Set aside.

2. Preheat the convection oven to 180 degrees celsius.

3. Lightly grease a 10" round casserole dish.

4. Mix the milk, eggs, baking mix and butter in a large bowl using a hand whisk.

5. Add the Muar otah, parsley flakes and freshly grated black peppercorn and whisk well.

6. Add the broccoli flowers, shredded cheddar cheese and bread cubes and stir well. The batter will be lumpy.

7. Pour onto the prepared casserole dish and bake for 50 minutes.

Tuesday, June 8, 2010

otah pie

Here is another illustration of how versatile the frozen Muar otah is.

This is a simple pie recipe that you can easily prepare beforehand and bake just before your guests arrive.


Ingredients

1 pc frozen Muar otah
2 eggs
2 pkts instant mashed potato flakes + hot water (quantity according to the directions on the box/packet)
1 cup biscuit and baking mix
freshly ground black peppercorn
dried parsley
bacon bits


Method

1. Grease and flour an 8" round pie dish. Set aside.

2. Microwave the frozen Muar otah on HIGH for 2 minutes. Remove from microwave and mash the otah in a mixing bowl using a fork.

3. Add the rest of the ingredients and mix well.

4. Pour onto the pie dish and keep in the freezer for 10 minutes.

5. Remove the pie dish from the freezer and bake in an oven preheated to 180 degrees celsius for 20 minutes and thereafter at 140 degrees celsisus for 10 minutes.

Wednesday, April 14, 2010

ham and celery quiche

When MIL gave us several slices of ham, before we could finish eating the ham, she gave us some more. So as not to waste the earlier batch of ham and before they expired, I decided to bake a ham and celery quiche.

If you do not like celery, you can substitute with spinach.

If you intend to use spinach, you can buy cooked spinach in a can or frozen. Whichever you choose, be sure to drain the spinach before using.

INGREDIENTS


2 cups low fat milk
4 eggs (lightly beaten)
3/4 cup Bisquick pancake and baking mix
1/4 cup butter (softened)
1 cup grated parmesan cheese - I used Kraft grated parmesan cheese
1 cup celery (sliced, boiled and drained)
1 cup ham (cubed)
1 cup shredded cheddar cheese
1 tbsp dried parsley
1 tbsp bacon bits


METHOD

1. Preheat the oven to 190 degrees celsius.

2. Lightly grease a 10" round casserole dish. Set aside.

3. In a large bowl, mix the milk, eggs, baking mix, butter and parmesan cheese using a hand whisk. The batter will be lumpy.

4. Stir in the rest of the ingredients using a wooden spatula and mix well.

5. Pour into the prepared casserole dish.

6. Bake for 50 minutes or until the top is golden brown.

Thursday, March 25, 2010

baked chicken breast with Thai marinade

There are numerous ways to marinate chicken breasts for purposes of baking. You could marinate it the "traditional Asian way", which would be to use salt, pepper, light sauce, dark sauce, etc.

When I marinated the chicken breasts that you see in this post, I decided to marinate them Thai-style. As I do not eat chilli, I omitted chilli paste in the marinade but if you prefer, you can add about 1 tsp of chilli paste to the marinade if you prefer the chicken breasts to be spicy.

To give the marinade enough time to "seep into the meat", I would advise that you leave the chicken to marinate overnight. When you do this, the flavours from the marinade would go into the chicken breasts.

Chicken breasts tend to be dry and tasteless and as such, when they absorb the flavours from the marinade, the meat becomes very tender and delicious.

INGREDIENTS

3 large chicken breasts
2 tbsp chopped garlic
juice from 4 small limes
2 tbsp ground coriander
1/4 cup fish sauce
1 tsp light soya sauce
1/2 cup coconut milk
1/2 tsp freshly ground sea salt
1/2 tsp freshly ground mixed peppercorn

METHOD

1. Mix the marinade together.

2. Marinate the chicken breasts in the marinade overnight.

3. Bake at 230 degrees celsius for 15 minutes on each side.

TIPS

If you like, you can add the following to the marinade:-

(a) 1 tsp chilli paste

(b) 2 springs of lemongrass (quartered and lightly pounded in a pestle and mortar to release the flavour)

Wednesday, March 17, 2010

baked creamy snapper fillet with mediterranean-style marinade

Da and I bought a large piece of creamy snapper fillet. I intended to marinate it for baking.

The last time that I marinated some fish for barbequing, I prepared a simple marinate of salt, pepper, freshly squeezed lemon juice and fresh rosemary leaves.

This time, I decided to prepare the marinate in a mediterranean-style. If you have leftover marinade, you can refrigerate it for future use.

INGREDIENTS

500g creamy snapper fillet (cut into large pieces)
1/2 cup freshly squeezed lemon juice
1/3 cup cooking red wine
1/2 tsp freshly ground sea salt
1/2 tsp freshly ground mixed peppercorn
1 tbsp finely chopped garlic
1 1/2 tbsp dried oregano
1 cup olive oil
1 stalk of fresh rosemary leaves (remove the stalk)

METHOD

1. Mix the marinade together.

2. Marinate the fillet overnight.

3. Bake with one side facing up at 230 degrees celsius for 10 minutes. Turn the fillet over and bake for another 10 minutes.

Monday, February 15, 2010

lemon and rosemary roast chicken

With our under-the-stove oven serviced and the advice of the service technician ringing in my ears (which is that we need to use this oven more often otherwise the heating element would spoil easily), I have finally plucked up my courage to roast a whole chicken.

Surfing the internet for an easy recipe that I can adapt/adopt, I came across a recipe for oven roasted chicken in HHB's blog.

The steps in HHB's recipe seemed easy enough to follow. However, I made a mistake of buying russet potatoes instead of harder potatoes such as Holland potatoes. I ended up with potatoes that softened too easily and were crushed under the weight of the chicken. As such, do excuse the seemingly burned portions that you see in the photographs in this post. The chicken and the potatoes actually turned out very delicious, with the exception of most of the potatoes being crushed.
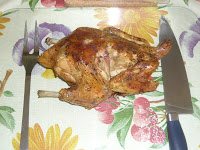
Another tip that I have since learned from SC (who in turned learned it from her godmother) is that if you are roasting food in the oven, it would be advisable to butter the aluminium foil before you place the raw food into the roasting pan.

If you have never tried roasting chickens in your oven, do give it a try. It can take quite a bit of time and involves turning the chicken over during the roasting process but the end result is worth it.

I have made some modifications to HHB's recipe.


INGREDIENTS

1 lemon
2 tsp freshly ground mixed peppercorn
2 tsp fine salt
2 tsp dried Italian herbs / dried mixed herbs
1 tsp dried rosemary
1 medium-sized chicken
butter
1/2 kg large potatoes (buy the type of potatoes that do not soften as easily as russet potatoes)
salt
freshly ground mixed peppercorn
olive oil

METHOD

1. Grate the zest of the lemon in a bowl. Add the freshly ground mixed peppercorn, fine salt and dried herbs. Mix well and set aside.

2. Remove the head and feet of the chicken. Rinse thoroughly and pat dry the chicken (including the cavity) using paper towels.

3. Place 1/3 of the seasoning mixture in the cavity of the chicken.

4. Using your fingertips, gently separate the skin from the meat of the chicken breast and push some of the seasoning mixture under the skin. Massage the skin lightly so that the seasoning mixture is spread out under the skin.

5. Rub the balance seasoning mixture over the entire chicken.

6. Leave the chicken in the refrigerator to marinate for at least 4 hours or overnight (up to a maximum of 24 hours).

7. When the chicken has been marinated, remove the chicken from the refrigerator and let it rest at room temperature for 30 minutes. Brush softened butter all over the chicken.

8. Peel and halve or quarter the potatoes. Place the potatoes in a pot of water with a pinch of salt and the whole lemon. Bring to the boil and cook for another 10 minutes. Drain and set aside for 1 minute. Toss the potatoes with some salt, freshly ground mixed peppercorn and olive oil.

9. While the lemon is still hot, pierce it with the tip of a sharp knife numerous times. Stuff the lemon inside the cavity of the chicken.

10. Line a roasting pan with aluminium foil. Brush the aluminium foil with some butter.

11. Arrange the potatoes in the roasting pan.

12. Tuck the wings of the chicken under the chicken and place the chicken (breast side up) on top of the potatoes. Bake in an oven preheated to 200 degrees for 45 minutes.

13. Turn the chicken over and bake for another 30 minutes.

14. Take the chicken (breast side up) again and roast for 15 minutes.

15. Remove the roasting pan from the oven and let the chicken rest for 10 minute before carving the chicken.

Blog Widget by LinkWithin